
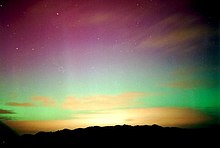
L'northern Lights or polar aurora or austral depending on the hemisphere in which it occurs, it is an optical phenomenon of the earth's atmosphere, characterized mainly by light bands of a wide range of shapes and colors rapidly changing over time and space, typically red-green-blue, called auroral arches.
The phenomenon is caused by the interaction of charged particles (protons and electrons) of solar origin (solar wind) with the earth's ionosphere (atmosphere between 100 - 500 km): these particles excite the atoms of the atmosphere that emit light of various lengths wave. Due to the geometry of the Earth's magnetic field, auroras are visible in two narrow bands around the Earth's magnetic poles, called auroral ovals. The auroras visible to the naked eye are produced by electrons, while those of protons can only be observed with the aid of special instruments, both from the ground and from space.
Often the polar aurora is also visible in areas less close to the poles, such as Scotland, or many areas of the Scandinavian peninsula. The auroras are more intense and frequent during periods of intense solar activity, periods in which the interplanetary magnetic field can show considerable variations in intensity and direction, increasing the possibility of a coupling (magnetic reconnection) with the Earth's magnetic field.
Plan your trip
There is no guarantee that you will see the Northern Lights, even if you are in the best areas. However, a little planning will radically increase your odds. First of all go in the winter.
Period of the year
Darkness is needed. Most of the observation points of the Northern Lights are at high latitudes, in areas where the "midnight Sun". In these places there is not enough dark from late April until mid-August. Therefore, during this period, no Northern Lights can be observed. The most intense Northern Lights are observed. from the end of September to the end of March when it's dark after 6pm.
Hours of the day
From 18: 00-01: 00 is the busiest time of the day. The highest probability within this period is between 10pm and 11pm. However, polar auroras can be observed during the night as early as 4:00 pm and throughout the night. In times of high activity, you can expect the event to start in the early evening, peaking around 10pm, and over into the early morning hours.
Clear sky
Last but not least: don't forget the weather forecast. If there are clouds in the way you will not see anything. In northern Scandinavia, the best weather is towards the end of the season (February-March). Weather is probably the most important factor and auroras are visible up to 80% of nights with clear skies.
Prepare for the trip

Clothing
Since auroras are usually visible at night in the colder months of the year, observers tend to spend long hours in the dark and cold. Dress appropriately is essential to minimize the unpleasant side of the auroral experience.
Winter clothing will be widely available in any area that has severe winters, but specialty shops for skiers, climbers or hikers generally offer the best choice.
In remote places in the north, food, fuel and equipment have to be shipped, and the costs can be very high. The major cities in the North tend to have better prices than the more isolated areas, but still higher than the areas further south. Most travelers should purchase most of their equipment before traveling; this saves money and avoids arriving with summer clothing, when it's -20 ° C outside.
Places
Light pollution around cities can mask a faint dawn. Therefore, areas at least 30 km from the cities are preferred to admire them. The trick is to get far enough out of the cities for good viewing (generally easy, as most northern areas aren't heavily populated) without taking undue risk in a climate that can easily kill you.
The shape of a polar aurora is very diverse. Bright arcs and rays of light begin 100km above the Earth's surface and extend upward along the magnetic field for hundreds of kilometers. The arches can be very thin, even as little as 100 meters, while extending from horizon to horizon. They can be almost motionless and then, as if an invisible hand has touched them, begin to move and twist. After midnight, the aurora can take a speckled shape, and each of the spots often flashes roughly every 10 seconds until dawn.
Most of the visible light in an aurora is a greenish yellow, but sometimes the rays can turn red at the top and along the bottom edge. On very rare occasions, sunlight can hit the top of the rays creating a faint blue color. Even more rarely (once every 10 years or more) the aurora can be blood blue from top to bottom. In addition to producing light, the energetic particles that form the aurora carry cold heat. This is dissipated as infrared radiation or carried away by strong winds from the upper lower atmosphere.
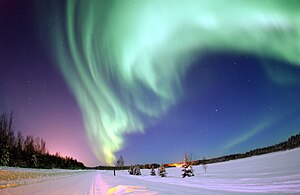
North America
.jpg/300px-Flickr_-_DVIDSHUB_-_Alaska_Aurora_Borealis_(Image_1_of_2).jpg)
North Atlantic Islands
Europe
- Tromsø is High, Norway
- Jukkasjärvi, Sweden
- Kilpisjärvi, Inari is Utsjoki, Finnish Lapland
- There Kola Peninsula of Murmansk Oblast, Russia
A luxurious way to see the auroras is to take a cruise ship along the coast of Norway or in Alaska, or towardsAntarctica for the southern auroras, in the appropriate season. Cruises tend to be expensive, but the costs can be very reasonable compared to flying to a good place on earth and paying for accommodation and a tour. Viewing the auroras simply by walking across the deck after dinner is much cheaper than being driven somewhere in the snow, with the likelihood of dangerous wildlife encounters.
However, there can be problems with cruises. Not all cruise lines run in the winter and it is extremely difficult to get good photos from a moving ship when the subject requires long exposures while seeing the auroras. If the cruise does not specialize in viewing the auroras, light pollution from the ship itself is likely to be an issue.
Southern auroras
The southern parts ofAustralia and of New Zeland they receive a large amount of auroras.
In particular, the Tasmania and theSouth Island of New Zealand are places where auroras can be observed several times a year. If the conditions are right, Hobart is Invercargill they offer the best possibilities in places that are quickly accessible from Australia and New Zealand. Although Christchurch has a geographic latitude south of Hobart, its "geomagnetic latitude" is further north, and the aurora is no longer likely to Victoria. Check the weather space as you travel.
If you want to go straight to the auroras of the southern hemisphere, you will have a difficult journey to make. Due to the misalignment towards the eastern hemisphere, it is not reasonable to expect any observations from the Patagonia and it is not likely that you will also see them from Antarctic Peninsula. The optimal trip would be the Ross Sea in Antarctica through theMacquarie Island (Australia) or the subantarctic islands of New Zealand. The best view would be from the boat itself. The island closest to the auroral belt which has a good range of tourist accommodation is theStewart Island.
Photography
| To learn more, see: Theme: Travel photography . |

Taking good pictures of the Northern Lights is a lot difficult, as they are fast moving, often faint and with a pitch dark background. Almost all interchangeable lens cameras are suitable for this task.
Long exposures are often required to capture dim lights. Here's what it takes to have a better chance of taking good photos:
- A camera that supportsmanual exposure (5 to 40 seconds)
- A fast goal (aperture f / 2.8 or higher). Typically, a wide angle lens is used to obtain a large area of the sky.
- High sensitivity film (800 ASA or higher), or the equivalent ISO setting on a digital camera.
- A tripod to get the long exposure.
- The release cable or selfie to take shots without moving the camera.
- Even better, for some cameras a remote controller.
- Manual focus. It is recommended not to focus only the lens on infinity, instead it is better to do it by aiming at the moon or a bright star (ideally in "live-view" mode and using the maximum zoom).
- Different spare batteries is memory cards: just having them, they will guarantee that they won't be needed. Keep spare parts warm.
- What you don't need is the filter in front of the lens: it can cause interference, so better remove it.
- Using your digital camera in RAW format (or at least JPG RAW) is a good idea.
- Avoid breathing on the lens or display to prevent it from freezing on top. A light source such as a flashlight or headlamp can be useful when setting up your camera and tripod, and a handy smartphone for alerts and weather forecasts. However, it is necessary that your eyes get used to the darkness, so it is a good idea to limit the use of these light sources and to set both the phone display and camera LCD to minimum brightness.
The ideal shooting position must have no light pollution, offer shelter from the wind and be easily accessible. On a cold Arctic night, you should definitely avoid dragging your camera and tripod over a long distance. Also, the wind tends to shake the camera, which is a problem for long exposures. A large, sturdy tripod helps, but it's hard to carry around. If possible, do some scouting in the daytime, so you can go straight to a good position at night.
Also, try to have something interesting in the foreground; the photo above is a great example. Either a zoom (variable focal length) or a single lens (single focal length) can be used - each type has its advantages. Zoom lenses are more flexible; you can quickly adjust for different light display sizes. Single lenses are typically much faster than zooms, are lighter and more compact.
Extreme wide angle lenses give some distortion, even producing "fish-eye" images at 10mm or below. The photo on the right was taken with a 16mm lens; the horizon appears curved and the trees in the foreground appear slightly off-vertical, but some viewers are unaware of this distortion. For the above photo taken in Scandinavia an even wider lens was used and it has more distortion. A slightly longer lens, perhaps 24mm, would reduce distortion, but would cover the sky. Zoom lenses have a significant advantage over single lenses; with a 16-35 zoom you can adjust each shot to get the best compromise between distortion and coverage. Under other conditions, you could carry several single targets, but this is downright inconvenient in the field on an Arctic night.
A faster lens or a high ISO camera setting can reduce the exposure time. For the photo on the right we used an F2.8 lens and 25 seconds of exposure. With F4 it would take 50 seconds. An F1.4 lens would cut the time by about six seconds. This is likely enough to give a sharper photograph because the lights move less during the exposure, and allows for a bit more control; if you press the shutter button when the sky looks particularly interesting, it is more likely to stay that way for a couple of seconds. High ISO settings however give more noise to the image and you may lose more than what you gain from the shorter time. The ideal choice could be either a 24mm / F1.4 wide angle or a 16-35 F2.8 zoom zoom, but these are mainly produced for high-end professional photographers.
Related items
- Theme: Natural attractions
Other projects
 Wikipedia contains an entry concerning northern Lights
 Commons contains images or other files on northern Lights